Monday, February 14, 2011

Woven Heart Basket for Valentines Day !


This was indeed a very nice craft to do. I made this for my Son's and Daughter's teachers. I wanted to make this for putting a gift card and few chocolates for the teachers.  I got this idea from the following website :
http://familyfun.go.com/how-to-videos/familyfun-woven-heart-basket-762419-v/

I would really like to thank them for this wonderful Idea. This is very simple but very elegant to hand out gift cards to the teachers.


Steps to go about doing this craft can be taken from the above mentioned website or for convinience I've pasted them below too !.
Materials for this project are :
  • Printable patterns (see Step 1)
  • White or colored paper
  • Markers or crayons (if using white paper)
  • Scissors
  • Glue
Instructions
  1. Print two copies of this template. If you are printing the templates on colored paper, print one of them on pink paper and the other on red; otherwise, print both templates on white paper and color them as you wish with markers or crayons. 
  2. Fold the printouts in half. Carefully cut out the shapes and cut along the dotted lines. The weaving steps will be a bit easier if, as a crafter has pointed out in her comments below, you cut a bit further up the inner dotted lines than indicated. Go slowly -- the more precise your cuts at this step, the better the basket will look.
  3. Time to start weaving. Orient the two halves, still folded, at right angles to each other, as shown in the photograph. Be sure that the "bumps" on the strips on each half point away from you.
  4. Now thread the left-hand strip furthest away from you through the right-hand strip furthest away from you.
  5. Thread the right-hand strip furthest from you through the next left-hand strip, the one second-furthest away from you.
  6. Now thread the next left-hand strip, the one third-furthest away from you, through the right-hand strip furthest away from you.
  7. Thread the right-hand strip furthest away from you through the left-hand strip second-furthest away from you.
  8. Finally, thread the left-hand strip closest to you through the right-hand strip furthest away from you. Whew! One pass down, four to go.
  9. Snug the right-hand strip up towards the curved end of the left template as far as it will go and smooth everything down (a process you should repeat after each round of weaving).
  10. Thread the right-hand strip second-furthest away from you through the left-hand strip furthest from you. See the pattern? Continue alternating your weaves either through or around the other strips until all the strips are finished.
  11. Glue on a paper handle if you like.
follow steps1 & 2.
follow steps  3 & 4.
Follow steps 5-10.


Final View

Valentines Heart Decorated by Kids


Wishing Everybody a "HAPPY VALENTINES DAY"  from our Family to Yours !! These valentines were decorated by my kids. It was my Son's  sharing at school where they had to decorate a valentine heart and he made it so that the Teacher can hang it in class. We cannot do this project without my daughter's cooperation, so we asked her to decorate one too. We decided to hang this at our door.

Red heart to the left:-  Crafted by my Son. Cut out the red heart from a card stock. My Son wanted to use shiny beads, sticker beads and feathers. In the middle he wanted to write "Happy Valentines Day". So he drew 3 borders to mark the space for each of the 3 items he wanted to paste. Then he applied glue on the stock and started sticking the shiny beads and feathers. Then he added little of bead stickers in the end. Then he added gold glitter glue to the borders where the pencil drawing was shown. Then wrote "Happy Valentines Day" in pencil and darkened it with a sharpie pen.

Red heart to the right :- Crafted by my daughter. My son cut out the red heart for her. She wanted the 3 butterflies so we made a hole and attached the butterfly for her. Then I applied the glue, but she was too good in sticking the shiny beads. Then I asked her to write happy Valentines day, and she wrote "Happy Happy Valentines Day" in pencil and darkened it with a sharpie pen. I guess this was one of her few projects and she got excited to do this. Then gave her little bead stickers to stick in the empty spaces. Added a little glitter glue around.

This was indeed a short and fun project to do with them. Thanks to my Son' school for this Idea.

Friday, February 11, 2011

Terra Cot Pot Painted - Birthday Gift for my Son's Teacher

The was a Terracotta Pot Painted by me for my Son's 1st grade Teacher for her birthday. We had purchased a gift for her to place inside this pot and wrapped it up. My Son also made a greeting card for his Teacher.
The Terracotta pot was painted Dark Purple. 

Then painted small squares (each square is painted different color) to have a letter of her name.  Outlined the squares with white paint. Then painted some flowers on the top of the squares and bottom of the squares and some celebration lines with different colors to finish off in the middle and on the empty space. The rim of the pot was painted with Golden metallic paint. Wrote her "name" and said "class" in white paint. Lastly gave the pot its shine by painting a glaze paint. The inside of the pot was also painted dark purple and a glaze paint to give the pot its shine.

Hoping his teacher will like this pot and will be used well inside Class.

Refer to some of my Terracotta projects for detailed descriptions. 


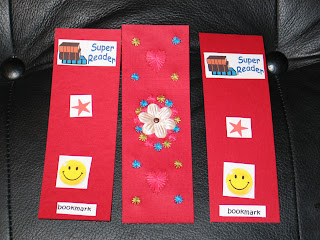
Bookmark - For sharing


Bookmary By My Son :- January of 2011, My Son had a project which he needed to make or share something with everybody in his class . He decided to give out bookmarks made by him.  Since he has started using computer, wanted him to practice some of his computer skills here. !

Very simple to make it, buy the bookmark (plain red color) from Micheal's craft store.  Using a computer software he created stickers and I printed them out on a sticker sheet. So all he had to do is cut out the stickers and paste them accordingly as shown in the picture. This was a very nice project.  We chose "Super Reader" sticker at the top, a star sticker for the center and smiley sticker at the bottom. He also wanted a small sticker "bookmark" to indicate its a bookmark.

Embroidery bookmark by me :- One in the center bookmark was made by me for his Teacher.
Since he was giving out to his class, I decided to do the embroidery bookmark for his Teacher. This was chosen from my previous designs so it not too tough. Pre-pricked the embroidery design with a special piercing tool and pricking pad. Completed the embroidery and came up with my own ideas to finish it off with a heart embroidery on the top, and glued a flower in the middle.

It was a nice project again to do with my Son and one for myself for his Teacher.

For our embroidery bookmarks projects refer to the blogs
"Bookmark by my Son" , "Embroidery Bookmark", "Bookmark and Quilling project".