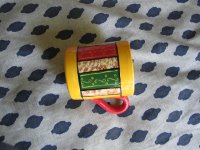
Hurray to this piece as it got me back into exploring my creative talents after 3 years of break for various reason – work , home kid, huzzy buzzy life style .
Well when I am getting back I still wanted to try out something new in Ceramic Painting - Etching and Sponging.
Sponging : Alternating to the red and green , a new technique was tried out scalled sponging - Using a sponge you wet the sponge with yellow paint and keep pressing little by little on the mug. On top of the yellow paint (on the sponging area), you wet the sponge with brown color and did the sponging again. Sponging should be done only once.
For more info on my ceramic painting refer to this link on "Introduction to ceramic painting" post.
1 comment:
Wow! All of them look great.
I have a suggestion. Since you do tile painting, you may want to do the same magic on "switch plates". If you can get hold of plain ceramic switch plates, you can do your paiting on it. It looks great. Sreela and I will buy it from you.
Keep going ...
Venkat
Post a Comment