Saturday, October 08, 2011

Summer Crafts - ceramic crafts and clay projects

During Summer the kids got to spend time doing doing crafts apart as their indoor activity and little bit of watching TV. I got to spend lot of time with them doing clay projects (Terra Cotta and regular colorful clays) and taking them to Color me Mine a studio for painting ceramic items. Apart from outing, they did lots and lots of coloring and drawing on paper, which they always loved to do. This blog mentions about the ceramic project and clay project.

Color me mine Activity- As you know I'm a big fan of ceramic paintings and done a lot of them. I also have taken my Son many times for him to paint. I started this year with my Daughter and got her introduced.
My Daughter - Its her first experience this year. She started with her 1st one with painting a cup pink and purple inside. The second one she did was a fish with orange and black.

My Son - This was his 5th project and he chose the ship/boat. He was very comfortable doing this one as he has done it multiple times.
They also did small items like the cupcakes and a candy by my Son and a cupcake and Hippo by my daughter. So they just loved doing all of it.


Clay Projects Kids got to try different types of clay -terra cotta, regular kids play dough and also a sculpy clay which you can mold and bake in the end.

Sculpy Clay The sculpy was fun for them to try out play with them. In the end we took few of them baked it in the oven as per the instructions and they saw the clay could harden and they were amazed to see the texture before and after baking.
Terra cotta Clay Kids loved the mud like effect of the clay. My son did a football, I did a basket and my daughter did a birds nest with eggs inside. They just loved doing.

Other activities was canvas painting, drawing and coloring, playing with the soft toys and playing with their tent inside.

Sunday, July 10, 2011

My Creation


I wanted to make an ARTWORK where I can bring out my creativity. This piece of artwork is very simple. I always wanted to do something with my scribbles and designs and this is just one of it.

If you see the background is black in color, and did a design with white pen. I did not want to do a very detail design, as it will not be visible from far. To bring out its beauty I added few colors surrounding the main/center design, and added colors to the flowers (you see surrounding outside). Did not want to put too much color where the main design gets hidden but a touch of colors here and there. Basically the 7 colors (Red, Blue, Yellow, Orange, Green, Purple and Pink).

The design is a combination of Mehendi/Henna design and adding color by cutting the black part and put a color paper below to bring out the colors to the front.

This frame I already had was black , just added an inside mat (french white) to add more depth to my design.

Not to forget mentioning - My family who helped me with this artwork. My son whom I can depend on to choose the colors (we tried out different combination's of colors before we chose this one) and my husband who wanted the inside mat for giving depth and for helping us hang this picture in our family room. My daughter who appreciates all my work all the time always with a smile.

For my other similar posts refer to My scribbles which grew over years into design.

Tuesday, June 21, 2011

Canvas Painting - For our Wall


To try out something different, I decided to try out my second canvas painting with acrylic paints. This is still new to me but worth the try. This project took several months to complete as I did little by little and finally completed last November.

I wanted to mix two colors on the canvas and divide the canvas, so painted the left hand side in BLUE color and RED on the right hand side. I wanted to put white flowers, but another friend gave me an idea to put colorful flowers instead of only white. I had stopped there and did not get time.

After several months, decided to continue this project and then in November when my Mom visited me decided to finish this project. So My Mom and me painted the different color flowers on the right. On the left (blue side) my Mom gave me an idea of putting small flowers instead of big ones and she gave me the idea of arranging the flowers as shown. To give its shine I put a glaze paint over the piece.

Very simple one but this is hanging in our family room and I'm definitely proud of this piece as I did this with my Mom - some memories to cherish.

Also wanted to add this is right now goes with our family room details of red carpet and blue curtains and the colorful flowers add more color to the room.

Monday, May 09, 2011

Teacher Appreciation Week 2011

Its again this time of the year where we appreciate our kids teachers for all their effort. This time I wanted to bring it out from the kids with very little help of mine. Since my daughter has started going to school, both my kids have done for their teachers.

My Daughter's Work :
We did 5 things giving her 1 per day. I kept it very simple ,and wanted her to color and draw.
1) drawing1 and drawing2 - very simple, wrote Thank you , she colored it, and I did the border with different colors. Idea is from my daughter, she in a blank paper keeps coloring different colors (think lines), so thought of using her idea and coloring different colors around for border. Her idea but I did the coloring as it was a lot for her to do.

2) drawing 3 - When I asked her to draw something for teacher, she drew 4 balloons. So instead of 4 I asked her to draw 7 for each letter in (T E A C H E R). Then came up with some describing words for each letter. [T-alented, E-nergetic, A-ctive, C-aring, H-elpful, E-xtraordinary and R-esponsible.]

3) drawing 4 - Asked her to draw an apple and color it (helped her with drawing of apple) but coloring is her work. I wrote the happy teachers appreciation week in pencil and she wrote on top of it with a black pen.

4) The last gift was a 8X10 photo of her class doing a silly pose. It was very cute and I thought they bought out the best in them, this can be a good memory for them to keep.
Just to add "She enjoyed doing all of it", and that's what makes me HAPPY !


My Son's Work :
It was from May 9th - May 13th and we again did 5 things 1 for each day. He wanted to very similar to his sisters but a little different.
1) Drawing1 - very simple, wrote Thank you , He drew and colored it, and He did the border with different colors. Idea is from my daughter,but he liked it and wanted to do it exactly similar.

2) Writing1 - We got this poem from the web and thought it was very appropriate for his teacher. I wanted to give each letter (describing her) each day to make her special, but my Son had forgotten to give her the first 3 days. So we just gave this sheet on the third day.

3) Drawing 2 - When I asked my Son to draw something for his teacher, he drew kids , and he drew 20 of them to represent all the kids in his class and he wrote " You are the best". This was totally his idea.

4) Drawing 3 - He also drew a Robot and wanted to give it to his teacher, so I asked him to write "From Pranay" And thank you on it. He loves Robots and wants to be a Robot, so why not represent this drawing to be him ? It was his idea of drawing this Robot but my idea of "representing my son as Robot".

5) The last gift was a 8X10 photo of his class all of them dressed up as 101 dalmatians. It was very cute and I thought She bought out the best in them, this can be a good memory for her to keep.

It makes me happy when I make the kids do it for their teachers. This is very little effort we put for all the efforts the teachers put throughout the year.

For my other appreciation crafts done by kids refer to the post "Teachers Appreciation 2010"

Saturday, March 19, 2011

Proud of my Son - Won 4th in Yearbook contest


Proud of my Son - He has won 4th prize in YearBook Contest in his school.

Year Book contest is a contest conducted by my Son's school open to all students every year. They need to draw a page telling what their school is about and if they win it will be printed up in front page and 2nd, 3rd and 4th winner's page will be at the back page of their year book. I could not wait till year book comes out to share this exciting news. But I am eagerly waiting to see where exactly they will print his name in this year's YEARBOOK.

Definitely have to give him credit for this. As my effort was only in motivating him to participate this year again and getting him to focus to do a wonderful work. I'm glad I asked him to do it.

My Son has participated last year in two such events (yearbook contest and red ribbon week) which involved drawing and coloring and also this year in the language school (Tamil school) - (Pongal festival contest) which involved drawing and coloring.

I would like to just end- Participating is not new for him but WINNING is definitely NEW !

Details about his Drawing

At the top - They were supposed to write a caption representing who they are. He also put a gold trophy representing that "we are number 1".

At the center - He likes drawing people. So it was not too hard for him. He has come a long way from last year from simple to adding more details.

He designed a star and put a star in purple and added a face with eyes, nose and mouth and was particular he had glasses and smiling. Then he wrote S U P E R each letter on 5 sides of yellow star and above the purple wrote STAR (saying SUPER STAR).
Then he wanted to put all events of his school- pumpkin panic, reading club, running club , walkathon and science fair, so he drew the events around the star as it was difficult to put it inside the star. Then he drew 2 games - 2 square game and wall ball which kids play a lot during recess representing recces time too !! Added a computer lab too as he loves computer lab. Labeled every drawing representing them.

At the bottom - He loves colors so he wrote the school name and year in different colors. If you notice the "Stevens" in rainbow colors and "Creek" he used different colors which he did not use before. For "2010-2011" he said that it was GOLD (like the trophy on top)

Finally finished the page with some coloring as he did not want to keep the page white.

Monday, February 14, 2011

Woven Heart Basket for Valentines Day !


This was indeed a very nice craft to do. I made this for my Son's and Daughter's teachers. I wanted to make this for putting a gift card and few chocolates for the teachers.  I got this idea from the following website :
http://familyfun.go.com/how-to-videos/familyfun-woven-heart-basket-762419-v/

I would really like to thank them for this wonderful Idea. This is very simple but very elegant to hand out gift cards to the teachers.


Steps to go about doing this craft can be taken from the above mentioned website or for convinience I've pasted them below too !.
Materials for this project are :
  • Printable patterns (see Step 1)
  • White or colored paper
  • Markers or crayons (if using white paper)
  • Scissors
  • Glue
Instructions
  1. Print two copies of this template. If you are printing the templates on colored paper, print one of them on pink paper and the other on red; otherwise, print both templates on white paper and color them as you wish with markers or crayons. 
  2. Fold the printouts in half. Carefully cut out the shapes and cut along the dotted lines. The weaving steps will be a bit easier if, as a crafter has pointed out in her comments below, you cut a bit further up the inner dotted lines than indicated. Go slowly -- the more precise your cuts at this step, the better the basket will look.
  3. Time to start weaving. Orient the two halves, still folded, at right angles to each other, as shown in the photograph. Be sure that the "bumps" on the strips on each half point away from you.
  4. Now thread the left-hand strip furthest away from you through the right-hand strip furthest away from you.
  5. Thread the right-hand strip furthest from you through the next left-hand strip, the one second-furthest away from you.
  6. Now thread the next left-hand strip, the one third-furthest away from you, through the right-hand strip furthest away from you.
  7. Thread the right-hand strip furthest away from you through the left-hand strip second-furthest away from you.
  8. Finally, thread the left-hand strip closest to you through the right-hand strip furthest away from you. Whew! One pass down, four to go.
  9. Snug the right-hand strip up towards the curved end of the left template as far as it will go and smooth everything down (a process you should repeat after each round of weaving).
  10. Thread the right-hand strip second-furthest away from you through the left-hand strip furthest from you. See the pattern? Continue alternating your weaves either through or around the other strips until all the strips are finished.
  11. Glue on a paper handle if you like.
follow steps1 & 2.
follow steps  3 & 4.
Follow steps 5-10.


Final View

Valentines Heart Decorated by Kids


Wishing Everybody a "HAPPY VALENTINES DAY"  from our Family to Yours !! These valentines were decorated by my kids. It was my Son's  sharing at school where they had to decorate a valentine heart and he made it so that the Teacher can hang it in class. We cannot do this project without my daughter's cooperation, so we asked her to decorate one too. We decided to hang this at our door.

Red heart to the left:-  Crafted by my Son. Cut out the red heart from a card stock. My Son wanted to use shiny beads, sticker beads and feathers. In the middle he wanted to write "Happy Valentines Day". So he drew 3 borders to mark the space for each of the 3 items he wanted to paste. Then he applied glue on the stock and started sticking the shiny beads and feathers. Then he added little of bead stickers in the end. Then he added gold glitter glue to the borders where the pencil drawing was shown. Then wrote "Happy Valentines Day" in pencil and darkened it with a sharpie pen.

Red heart to the right :- Crafted by my daughter. My son cut out the red heart for her. She wanted the 3 butterflies so we made a hole and attached the butterfly for her. Then I applied the glue, but she was too good in sticking the shiny beads. Then I asked her to write happy Valentines day, and she wrote "Happy Happy Valentines Day" in pencil and darkened it with a sharpie pen. I guess this was one of her few projects and she got excited to do this. Then gave her little bead stickers to stick in the empty spaces. Added a little glitter glue around.

This was indeed a short and fun project to do with them. Thanks to my Son' school for this Idea.

Friday, February 11, 2011

Terra Cot Pot Painted - Birthday Gift for my Son's Teacher

The was a Terracotta Pot Painted by me for my Son's 1st grade Teacher for her birthday. We had purchased a gift for her to place inside this pot and wrapped it up. My Son also made a greeting card for his Teacher.
The Terracotta pot was painted Dark Purple. 

Then painted small squares (each square is painted different color) to have a letter of her name.  Outlined the squares with white paint. Then painted some flowers on the top of the squares and bottom of the squares and some celebration lines with different colors to finish off in the middle and on the empty space. The rim of the pot was painted with Golden metallic paint. Wrote her "name" and said "class" in white paint. Lastly gave the pot its shine by painting a glaze paint. The inside of the pot was also painted dark purple and a glaze paint to give the pot its shine.

Hoping his teacher will like this pot and will be used well inside Class.

Refer to some of my Terracotta projects for detailed descriptions. 


Bookmark - For sharing


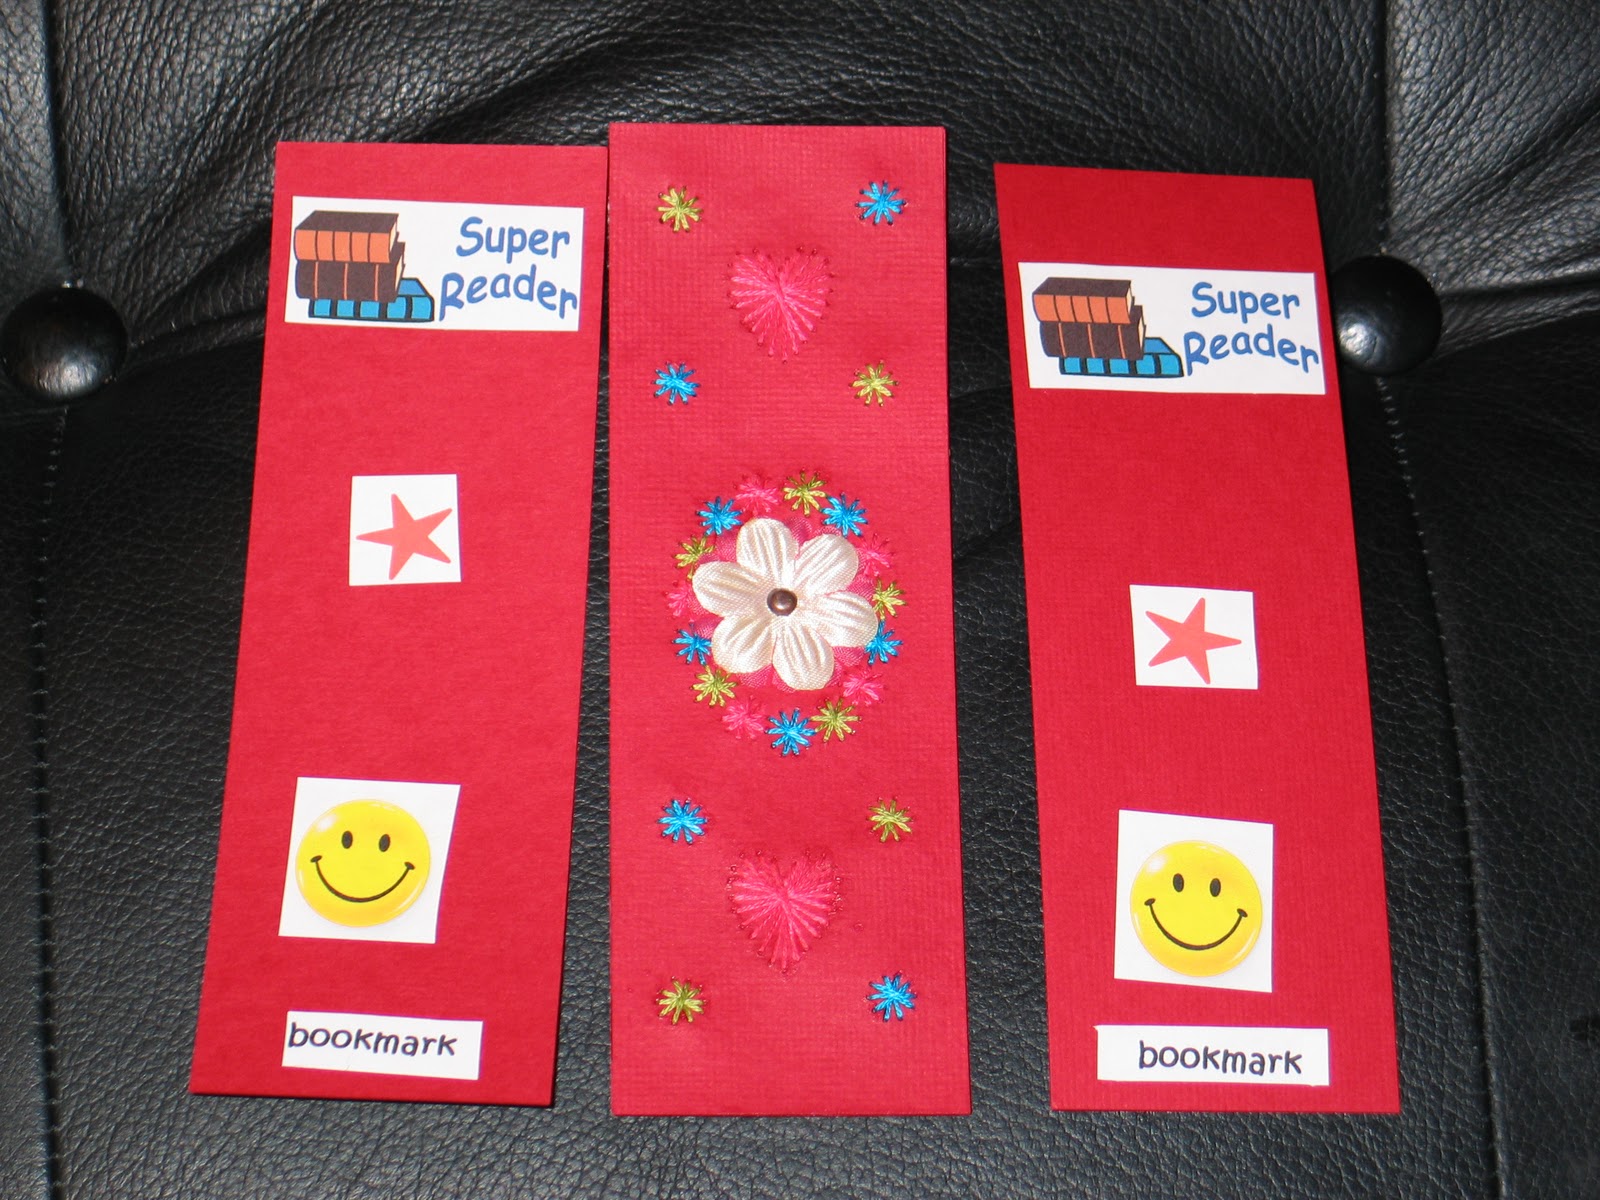
Bookmary By My Son :- January of 2011, My Son had a project which he needed to make or share something with everybody in his class . He decided to give out bookmarks made by him.  Since he has started using computer, wanted him to practice some of his computer skills here. !

Very simple to make it, buy the bookmark (plain red color) from Micheal's craft store.  Using a computer software he created stickers and I printed them out on a sticker sheet. So all he had to do is cut out the stickers and paste them accordingly as shown in the picture. This was a very nice project.  We chose "Super Reader" sticker at the top, a star sticker for the center and smiley sticker at the bottom. He also wanted a small sticker "bookmark" to indicate its a bookmark.

Embroidery bookmark by me :- One in the center bookmark was made by me for his Teacher.
Since he was giving out to his class, I decided to do the embroidery bookmark for his Teacher. This was chosen from my previous designs so it not too tough. Pre-pricked the embroidery design with a special piercing tool and pricking pad. Completed the embroidery and came up with my own ideas to finish it off with a heart embroidery on the top, and glued a flower in the middle.

It was a nice project again to do with my Son and one for myself for his Teacher.

For our embroidery bookmarks projects refer to the blogs
"Bookmark by my Son" , "Embroidery Bookmark", "Bookmark and Quilling project".

Tuesday, November 30, 2010

Thanksgiving decoration year 2010


Got this idea from my Son's school last year , where they asked each kid to decorate one feather and the teacher had done a wonderful job of putting all the feathers with one big turkey body on the door.

We decided to do a similar one where the blue feather was done by my Son, the purple feather was done by my daughter and the rest of the 3 feathers were done by everybody including my husband, and my parents.

The supplies include "craft paper of different colors, bead stickers which I usually use for other projects, feathers from last years idea and leaf stickers ". All we did is cut out the feather shape from different color papers. Draw an outline and then stick bead stickers. In the middle, stick feathers and leaf stickers. The body of turkey was drawn by me in brown paper and cut out , but my son helped me with the eyes and the nose.

It was a fun family project and we all loved it when it was hanging at our door. For more information on last year project refer to blog "Thanksgiving game and activity ".

Monday, November 29, 2010

May flower basket


One of my son's homework was to do a May flower basket and drop it off at the neighbor's house. Since I have a three year old also, we did a total of 3 baskets, one made by my Son, one made by my daughter (only the bead sticking part) and one by me just to show the kids how to do it.

Take a white paper and fold in in a cone shaped. Fold the bottom and stick it with a tape (middle and right one as shown on the photo), or leave it in tapered form. (left most one). Then with pipe cleaner make the handle as shown. Since pipe cleaners are easyto bend and fold, we used this to make the handle.

To decorate the basket we used bead stickers. It was easy to stick and make any design by kids. For my other projects with bead stickers refer to the project "Goody bag with 3d gem stickers", and "bookmark created by my Son".

Filled it with our garden flowers and handed one of them to our neighbor.

It was fun easy and kids loved doing activities with Moms !!

Halloween Oct 2010 Decorations

This year's halloween decorations was very similar to last years but skipped a lot due to time limit. Usual tradition of pumpkin carving was skipped this year too. But instead, we decorated small pumpkins with foam stickers and placed it at the entrance. You will see pictures of them below. Lets say it was very simple project done by my kids.

Let me walk you through with all the things the kids did.


 Pumpkin Wreath :- The kids did many pumpkins using dot-art pens on paper and my son gave directions on how to draw the eyes, nose and mouth. Then we taped to a pipe cleaner in a circle form and hung it on the door.
Ghosts-  I'm not into drawing ghosts. So my Son took in charge and draw ghosts and cut them out. The least help I did helped him hang it on the door.
Halloween glow stickers :- We received a 3 pack Halloween glow stickers which we pasted them on the door.


Pumpkin decorations :-


Pumpkins were decorated with foam stickers one by my daughter and the other one by my Son.  They were foam stickers to decorate pumpkins. Since we got this as a gift along with the 3 glow stickers, we decided to decorate the pumpkin with the foam stickers. The set had 3 different kinds of stickers. My daughter chose the one with green eyes and purple nose and yellow mouth. My son wanted to do the black one. It was a very easy project for a 6 year old but a good one for my 3 year old daughter.

This was a very simple project but my kids enjoyed doing such projects with me. This time their grandparents also loved seeing the grandchildren doing such projects.

Gift for teacher June 2010 - Painted terra cotta pot


As the school year ends, we decide to give teachers gifts. When it comes to individual gifts, I try to do something along with the gifts I buy. This time for my daughter's school teachers (year school ends in June) I decided to paint the terracotta pots and give the gifts and pack it along with these. The Pot can be used to plant pots or to use inside class as (pencil/pen) holders.

I painted 5 pots, 2 big yellow ones are for the 2 main teachers and the 3 small ones are for the remaining teachers who have helped. The size was no intentional, I got the count wrong and had to get 3 smaller ones as  the big size was not available.

The 2 pots were painted yellow with purple on the top, did some designs on the. The other 3 were painted pink with gold color at the top rim. Did a design with a black pen.To finish it I glazed the plate with glitter glaze to give the finishing touch (its shine).

To fill inside these pots, you can buy small gifts and wrap them and personalize it the way you want them. I bought small gifts put inside them, wrapped them with a transparent sheet and tied a ribbon on the top.


For more information on Terra Cotta painting refer to my blog "First Terra Cotta pot painting" . Another craft was the terra cotta candle holder "Terra cotta candle holder".

Monday, August 09, 2010

My scribbles over years grew into design

I found this among my papers I had stored, and would like to say "THIS IS ME" !

From young I always scribbled designs on paper. It was small little ones, to now bigger ones like this. This is the only sample I have to show my ART like this, never store them, but you will always find them in my school books (while studying school and college) and office books (which I used to write notes of office stuffs). This grew into putting Mehendi when I was young (Henna designs) or Rangoli designs(I wished I had a sample of my Rangoli designs).

But today you think I'm different, I would say "No not at all". If you give me a paper and a pen this is what I will do. This is one of my methods of relaxation. Many who come home and seen this have really liked this and today I decided to put this on my blog. If you ask me to repeat the same I don't think I can do the same design, they will be similar but not the same.

I see some kids doing where I started, and some kids doing other things (like origami or lovely painting, or even kids who are interested in sports...or solving difficult puzzles) and my advice to all those Parents, encourage them, as they grow. For me its a good feeling when somebody appreciates your art (whatever it is) , it keeps you going in LIFE with all the ups and downs you have in your journey life. This is how I started and THIS IS ME !!

I know my designs, arts and crafts and my Blog inspire a lot and my only wish it inspires more and more as years come by.

I would like to Pause and say "Thank you" for encouraging me , appreciating my BLOG and commenting on my projects which keeps me going and going and going !!

Unique gift card holder which can fold and expand


This Gift Card holder is Unique in its design , it can be folded and can be expanded. When expanded it shows the gift card and all the kids names. This was created for my Son's tamil (language) teacher for the year 2009-2010.


In a long strip of paper first make sure your gift card fits. In the remaining space fold the paper to that many number of kids in the class. Since this class had only 9 students, it was easy to use this method. So in each fold write one kid name in different colors.

On the left hand side wrote the teachers name. On top I wrote "From all of us" and at the bottom after the kids names in the middle, I added "and Parents".

On the 2 ends, I punched a hole and added the 2 ribbons to tie the 2 ends after folding the card. So this card can be folded. Placed it inside a pouch so that its easy for the teacher to carry.

Everybody really liked the idea because all the kids names could fit inside one card.


Sunday, May 09, 2010

Bookmark created by my Son


As April approaches you know I'm preparing for the goody bag as its my kids Birthdays. I started this bookmark project and we suddenly we had to move to a different house. So instead of stopping and not doing anything as I had to pack for our move, I decided to involve my Son into getting to do bookmark for his school friends.

Very simple to make it, buy the bookmark (plain red color) from Micheal's craft store. I had these beads stickers which I asked him to stick. Then for the center, we had bought some stickers during valentines day time, so we used those and pasted them in the center.

Punched a whole on the center top, and tied a blue ribbon was the only thing done by me. We left the behind blank so that his friends can personalize them the way they want to !!

My son is 6 years old and they keep reading a lot of books both from school and public library. Hence I decided to do this so that all the kids at that age are into reading and excited about reading or getting books from library both at school and public library.

My son loved doing this project even though we had to about 30 of them. I had fun watching him do this project with a very little guidance from me.

For more information on my bookmark projects refer to my previous posts "Embroidery bookmark" and one I did for his school teacher "A Bookmark- paper embroidary and Quilling ".

Ceramic Business card holder


As you all know when I gift, I use my creativity and hard work which gives me intense pleasure and satisfaction when I do something personally for somebody. This project was done in March 2010 but gifted on April 5th 2010.


This gift which I've mentioned is very simple but got time to do this for my agent. She has indeed put in a lot of hard work in getting this house for us. So to really show our appreciation and her dedication I created this small gift - business card holder so that she can keep and use at her office.

I painted the main part with green sparkle paints and the front with orange sparkle paint. With black paint I wrote her name. At the back with black paints, wrote " Thank You". Underneath the holder,put my initials as usual.


For more detailed information on ceramic painting projects - refer to the following individual projects "Introduction to ceramic painting" or "Ceramic plate painting" or "Ceramic tile candle holder" or "Ceramic toothpick holder".


Friday, February 12, 2010

Valentine flower Arrangement

My Daughter's day care teachers were celebrating the valentines day with all the kids exchanging gifts, to make the day special for her teachers I decided to do this flowers arrangement and box of chocolates as a last minute gifts. I really hope they will appreciate and like it.

To go ahead with this project all I did was I purchased all the items individually and put them together. The Tin and the Red Red artificial flowers were bought from the a craft store (Micheal's craft store). The tin was already painted red with white hearts and had a pink ribbon attached. I bought a Styrofoam , to fit inside the tin, arranged the flowers on the Styrofoam and placed them inside the tin. This whole project was done less than 45 minutes. Also one of the reason I have not glued the Styrofoam to the tin is basically to give the flexibility to them to use the tin for other storing purposes (holding kids pencils or crayons or even for potpourri arrangements).

The red color heart chocolate box was placed inside the flower arrangements before giving it to the teachers.

To see one more of my flower arrangement project you can refer to the recently done craft for my son's school teacher "Teacher's appreciation week gifts".

3 Flowers from pipe cleaners


When we suddenly came to know about My son's teacher's birthday and my son wanted to do something for her, we decided to try these a bouquet of flowers with the pipe cleaners.

First take the red pipe cleaner and make it into round coil form. Then take the blue pipe cleaner and start making a flower shape (like an oval) going underneath the red coiled pipe cleaner and coming above and so forth. I used two blue pipe cleaner to make one flower( 5 petals). Then attach it to the green stem (green pipe cleaner). Similarly do the orange flower and white flower and attach them to the green stem. It was a cool thing to try out with a 5 1/2 year old boy.

Then added a white (address label sticker) and asked him to write happy birthday and another one from having his name and attached it to the bouquet.

Thursday, February 04, 2010

Teachers appreciation gifts - year 2010

A Terracotta Painted pot and A Book mark by Me.
A drawing and a thank you note puzzle by my Son for his teacher.

Teachers appreciation week in my Son's school is celebrated from Feb 1st to Feb 5th 2010. The Theme is winter olympics and tagline was "our gold Medal educators". Every day we need to take specified items (assigned by PTO) to the teachers. Details given below for each craft/project work completed by Son and me.

Day 1 - Fresh cut RED, White or Blue flower to support our USA olympic team.
My project :- When we think of olympics we first think of the opening ceremony to light the olympic torch. Hence I used a similar idea of to start the appreciation week with a "TORCH". The pot was painted, decorated with "RED" and white flowers and on the middle placed the white candle to represent it like a TORCH.
My pot colors were Red at the bottom, white in the middle and blue on the top of the pot. At the rim I painted it dark yellow to represent "GOLD". I added few dots, stars and spiral design to fill the pot with gold and black pen. On the white part I added this quote "A good teacher is like a candle - it consumes itself to light the way for others", Added a "Thank you" in the front on the red colored area. Finally glazed the pot to give its shine.

Day 2 - Classroom Supply. Whatever is the supply we need to pack the supply in either red/blue or white wrapping paper.
My Son's Project :- Made my son draw something for the teacher to show his way of appreciating the teacher. Taught him the Olympic symbol, the significance of the torch and few sports. So he decided to draw a man skiing and snowboarding for representing "sports" and snowman, a Christmas tree to represent "winter". He also drew the Olympic symbol along with 2 medals and wrote the letter "T E A C H E R" and wrote a Thank you at the bottom of the page.


Day 3 - Gold medal/Ribbon note : written note from the student to the teacher thanking or praising them for an accomplishment or nice gesture.
My son's Project :- One day as he was working on puzzles, he took one puzzle with 12 pieces and drew/traced it on paper and gave a color to each puzzle pieces. We thought this was his creation and will use this to write a thank you note for his teacher. I asked him to write on small white stickers "the thank you note wordings" for each puzzle and made him paste it on each of the puzzle pieces. Over all its the thank you message broken down into 12 pieces. Due to the time limitations for the teacher, we are not going to cut the puzzle but just give that sheet as a thank you note inside a envelope.


Day 4 - A New, grade level appropriate, book or game for the classroom.
Bookmark project :- Since we were donating a book to classroom I wanted to have the teacher have something for memory. Crafted this bookmark for her memory.
Take a red book mark card card stock. I used a concept of "Paper embroidery (oval design and flowers outside as borders) and quilling to make the flower (inside the oval design) on the book mark. Then to fill the gap I added a small ribbon on the top and added 2 flowers (bought from a craft store) at the top and the bottom. Its in a form of sticker. Stick another red card stock at the back of the bookmark to make it look clean and to write a note for the teacher.
For detailed information of this project refer to "Bookmark - Quilling and paper embroidery"

Day 5 - Come dress in Red, white or blue to honor the teachers.
this was simple and nothing extra done but dress my boy and send him to class.

This whole project done this week gave me a sense of satisfaction and happiness when I can make something personally for the teacher to appreciate her work.