Friday, November 13, 2009

Thanksgiving Game and Activity

Game played as a family and Decorating a Turkey feather was the activity.


For my son's school project we had to decorate one turkey feather to make one "family turkey" for their classroom. We had to decorate it however we like. This was a project "for family to do together and mainly we had to make it represent our family."

My idea of doing this project together was to allow my son to decorate the feather how he wanted and the only way to include my 2 year old daughter and husband to be a part of this was to play a game and attach it to the turkey feather. Since as a family we do lot of activities together, we decided to do this thanksgiving game as an "activity together".

ThanksGiving Game :- I found this game over the internet when searching for thanksgiving ideas. This game is called "Thankerchief" - Pass a thankerchief (handkerchief) around in a circle. The player holding the "thankerchief" when the poem ends, must say aloud, one thing for which they are thankful for. The poem is as follows :
Thankerchief, thankerchief, around you go
Where you'll stop, nobody knows,

But when you do, someone must say,

What they are thankful for this day.


We played a game as a family and it turned out to be a huge success !! My kids still want to play this game !! They just loved it. Since we played this I represented this on a card. Inside of the card as we open I have put all our names and on the right hand side (inside of the card) we have written what we are thankful for.

Feather Decoration - Coming to the main part of decorating the feather which was my sons contribution , he asked for feathers, glitters, leaves and buttons (as per the instructions given ) and I had told him only to include feathers in the middle with the "card I had made". The rest of the area was totally his idea of decorating with all the items.

He actually surprised me with his motor skills from creating patterns, applying glue and sticking all the items. My assistances was very minimal (except for the card) and enjoyed more by watching him decorate the feather.


Back Side of Feather - At the back of the feather he wrote his name, room number and his grade. I created the back side of the card to include the "contribution information" and mainly a "thank you" note to the school for giving this wonderful idea of decoration which got us to play this game as a family and a group hug.
This Game and activity turned out to be the best activity done for this month.

Sunday, November 08, 2009

Halloween crafts and decorations 2009

Usually we have the tradition of pumpkin carving and because of time limitations we had to skip it. But it does not feel Halloween for the kids if you don't do anything. So this year we (my son and I) decided to do the decorations and hang it outside instead of buying the decorations from the store. It was indeed a nice project for both of us. We could sit and complete this in 2 days.

I will walk you through the list of items created.

From the door:- we can see few things. A Happy Halloween writing, a pumpkin wreath, a bat and ghost cutouts. Clear picture is given below.
Happy Halloween writing:- We wrote a "HAPPY HALLOWEEN" on a long paper and painted it using "glow in the dark" paint (orange color) and my son colored the rest with black crayon. We did 3 of them (One for the door) on on the sideway (done by my son) and one on the front gate.
Pumpkin Wreath :- Mommy did many pumpkin using dot-art pens on paper and my son gave directions on how to draw the eyes, nose and mouth. Then we taped to a pipe cleaner in a circle form and hung it on the door.
Bat and Ghost cutouts :- From the web (activity for kids website) got a picture of bat and ghosts. So I asked him to cut out bat on black paper and ghosts on white paper. For the ghosts, he drew the eyes and mouth and wrote BOO. For the bat we put eyes with white glow in the dark paint.


On the sides :- we just hung the "happy Halloween writing" or only the bat and ghost cutouts. We did the same on sides visible near the door and near the postbox area.

On the bottom:- near the door and step (see the top picture) we can see a white ghost (4 of them). This one we used a milk can painted the front"white" (glow in the dark paint) and my son got to do one can fully. He drew eyes and the mouth with black marker on all of them. Then I cut the back little bit to stuff the white kitchen tissue roll so that can will look more white. To cover the lid just used a white kitchen tissue and taped it at the back.

Overall the project came out well and we just loved it. The only draw back was the glow in the dark paints did not glow as much as I expected it to !!.

Tuesday, October 27, 2009

Peel & Stick Foam Mosaic Art

This Art project is called "Peel and Stick" by number - theme is spring flowers.

Knowing my work I like to try different crafts and decided to choose this one to try out with my Son (its for ages 5+) and we just loved doing this together.


On the top left was done by me. The other two (flower in a pot) and (3 flowers with stem) were done by my Son (5 1/2 year old). My Kid loved it as much as I did !!

As the name suggests "Mosaic Art" is basically lot of small pieces of any kind (glass or ceramic or foam) put together to form a design. So chose the foam material which is safe for kids to do.

The foam pieces come in different sheets in sticker form. We have to make the picture come alive by creating beautiful mosaic scenes by placing the sticky foam squares on the numbered scene boards.


Instructions from the box is as follows.
1) Choose one of the 3 scene boards to work on first.
2) Pick a colored foam sheet you want to work with first and look at the legend on the box to find the matching number.
3) Peel off a 1/4" foam square from the foam sheet and place it over the number on the scene board and press it down with your finger. Continue to place the colored foam squares on all the numbers for the color you are working on.
4) Continue to place the other colors on the scene board just as you did for the first color.
5) For outer boundary areas only a few numbers are given for a whole section. Fill the area with colored squares of that color.
6) Congratulations ! now your piece is ready to be framed !!

Bought the frame from IKEA store (colored frames) and framed it and the 2 pieces are hanging in our living room and one in my Son's bedroom.

I consider this as "good motor skill development activity" for kids to work on.

Sunday, September 20, 2009

Building a Farm and a small Barn with my 5 year old


This project was done for a function (Indian Function - Navarathri Gollu) where we keep God in few steps and a theme which you create (its not a mandatory one, but a fun activity for kids to participate in the whole function part). This craft was done with my Son (5 year old) .


My son was always fascinated with barn and farm animals when he was young and now when he used to read more in books. So decided to create this with his help.

So the basics of the project is building a farm - arranging the grass, putting the fence, keeping all the farm animals and building a barn. He also wanted a pond for the ducks. Lets go through in steps on how we created this project.


The Barn - Basically taking any juice carton (small size), paint the carton with Red color (2 times to hide the writings on the carton), remove the opening (cut it off). Then using the mailing labels sticker, did the door and window by cutting thin strips and paste them as shown above. The design of the barn was taken from a book which he used to read. Only the white sticker for the door and window was done by me. Rest was my son's effort.

The Green Tray - So we took a thin aluminum tray and he painted it with green color. This tray was done to keep everything the grass, animals , fence and the barn on it for display. Since aluminum tray has a shinning effect painted it green to match the grass color.

The Items purchased :- The grass (artificial grass) , the fence and all the farm animals were bought from a craft Micheals store.

The pond :- we took a small paper and cut it in a round shape and he painted it blue.

The final arranging :- Once all the items dried after the painting process, I put the grass on the green tray, and the fence but arranging the farm animals and the barn were done by my Son. So he loved doing this project every second of it.

Indeed a nice project to do with your kids. The photo below shows the navarathri Gollu.

Thursday, May 28, 2009

Magnetic pen holder or a gift card holder


One of the teachers in my daughters day care were leaving (May 2009),I had to complete this project in a day as her last day changed all of a sudden. So due to time limit constraint, I executed this project for all the teachers in a day's time. So I basically came up with a multipurpose item as mentioned in the title.

Painted this wooden gift bag in Red color (used metallic paint) to get the shiny affect. Then stuck 3-d gem stickers on them to fill up the space. At the back of gift holder I pasted the magnet (comes with one side sticker and other side magnetic layer) to create a magnetic pen holder.

Filled it with a thank you card, a gift card and some chocolates.

So here is a simple project for anybody to do in a day. The ladies liked it, and its simple and different .

Monday, April 27, 2009

Scratch design DIY kit

As you know by reading my posts that I'm very much interested in crafts. I created this DoIt Yourself Craft kit as one of the items in our this year goody bag for kids.

I ordered the scratch design frames (100 of them) from the web which comes from different shapes and sizes.

Created a kit where- each kid gets 4 frames to design ,a craft stick, instructions and a sample frame designed by me. Basically you can draw with the craft stick (cut at an angle and can be the tool to scratch or draw) and the black part comes out and your design shows up with rainbow colors. Decided to do this as one of the items because my son loves rainbow colors.

The picture included in this post are frames designed by me and given as a sample for the kids to get an idea on how to go about doing this craft. Seems or looks to be very simple but when we need to do 35 of them, what do you say ?


For me this craft and making this craft kit for kids was very exciting and new thing to try. So hoping the kids are going to love it the same way as I did.


For more information on the goody bag craft in detail refer to my blog post "A Goody Bag with butterfly and 3d gem stickers".

Wednesday, April 22, 2009

A Goody Bag with butterfly and 3d gem stickers


Its this time of the season called the birthday month in our house and I'm very busy with organizing my kids birthday parties. Like before, I wanted to do something creative for the goody bag and decided to decorate the goody bag itself. My daughter's first and my son's 4th birthday were celebrated in India and did not get to use my talent to personalize anything for the kids as we could not carry them due to baggage limit.

Since this is my daughter's first birthday celebration in US and she gets very fascinated with butterflies I used butterfly theme on this bag. As my son loves rainbow colors I decided to use different color 3d gem stickers in making this bag. I also bought a rainbow image name tag to write each kids name on the other gift. Also created a thank you sticker having the rainbow and butterfly image with my kids name on it.


The FOAM BAG : The Foam bag, butterflies (different designs and colors) and the 3d gem stickers were ordered from the web. Made a very small hole on the center of the foam bag and attached the butterfly (pinned) to the bag. Arranged the gem stickers around the butterflies to fill up the space. Simple as it seems but when i completed doing 46 goody bags (14 for my daughters day care kids and 32 for "the" birthday party kids), I had a big SMILE on my face. The satisfaction you get when you achieve something this small is GREAT !!


STICKERS/NAMETAG: Created a thank you sticker with rainbow image and butterflies image with my kids names on it from the software's available with me and pasted it at the back side of the bag and the other gift. Also bought a rainbow name tag to write each kids name and my son with joy helped me write all the kids name, helped me pack the other goody bag gift and pasted the stickers on them. He is 5 and proud to be the BIG BOY and helping me with all this. It was really fun to do this project with him.


thank you sticker designed by me.


For more information on goody bag items I have created refer to my previous blog -"Goody bag for my son's birthday" and "Windmill for my sons bday party gift".


Friday, March 13, 2009

Ceramic tile - Candle holder (wall hanging)


To blend things in the kitchen and family room, I used the same color theme for this tile (as my ceramic toothpick holder) to the ceramic tile so that they can go in the same room. I created 2 pieces of the same deisgn to be hung either side of the patio door in our family room. I ordered a iron cast frame (from online) for this tile which comes with candle holder. The tile size I've used is 6 inches.

The design was very simple, just a color of orange,blue, green as border then a red flower in the center. Outlined the orange, blue and green border with black paint to give an elegant look. Also colord the back of the tile black to match the cast iorn frame.

The 2 tile candle holder which I created are hanging in our family room and filling up the empty space in our family room.

Reading my other ceramic projects, you bet must be wondering how different it is from the rest. Well it is. If you observe the paint, its different from my other ceramic crafts projects. It is called "sparkle paints", so it has tiny particles along with the paint to give it a shine once glazed. So there are very few colors to choose but I've used sparkle paint throughout.

For more information on my ceramic projects, refer to my previos blogs "Introduction to ceramic painting" , "ceramic mug painting", "ceramic plate painting".

Tuesday, February 10, 2009

Ceramic toothpick holder


This piece was created to enhance my kitchen window . With curtains and windows being all white in color, wanted to add small details to the window. We put a small plant on a thin dark blue vase. So wanted to add more details to the whole area.

This piece in the store said it can be used as a toothpick holder. So for parties I can use it as a toothpick holder and for the rest of the time it can be a decoration on my kitchen window.

Reading my other ceramic projects, you bet must be wondering how different it is from the rest. Well it is. If you observe the paint, its different from my other ceramic crafts projects. It is called "sparkle paints", so it has tiny particles along with the paint to give it a shine once glazed. So there are very few colors to choose but I've used sparkle paint throughout.

For more information on my ceramic projects, refer to my previos blogs "Introduction to ceramic painting" , "ceramic mug painting", "ceramic plate painting".

Wednesday, December 17, 2008

Terra Cotta Candle Holder

This is one kind of Terra Cotta plate candle holder which I painted (did 4 of them) for my son's school teachers. Painted inside of the pot Dark green and the rim Red (inside and outside of the plate). The outside was painted sandstone color and made green and red stripes and added a flower design.

On the inside I drew a Christmas tree with golden Terra Cotta marker, and wrote Merry Christmas and Happy New year. To add to the Christmas theme, I added glitter on the outside rim of the pot. To finish it I glazed the plate with glitter glaze to give the finishing touch (shine).

Another kind was Terra Cotta Pot candle holder (2 of them) for my daughter's day care teachers. Made a similar concept as my "First Terra Cotta pot painting", but added the glitter on the outside rim of the pot. Painted the inside of the pot RED. Finished the piece with glitter glaze.


For more information on Terra Cotta painting refer to my blog "First Terra Cotta pot painting" .

Embroidary Card - Holly Wreath

Initiated this project to make a card for my son's school teachers. Since I was busy with my baby last year, I could not do something of this kind ( Embroidery on paper) which needed effort and patience.


This card design downloaded from online, pre-pricked the embroidery design with a special piercing tool and pricking pad. Completed the embroidery (Green for the leaves, yellow for the bow each of them with - 2 strands of embroidery thread) and finished off with red dots for border, and wrote Happy 2009 in the center.


Covered the inside of the card (which shows the thread) with another white sheet so it looks clean and nice. Wrote a personal message on the inside of the card.


This gives me a sense of satisfaction and happiness when I can make something personally for each of them to appreciate their work.

For more information on my embroidery project on paper refer to my blog "Embroidery bookmark".

This was one of the craft I did for them.. Refer to the other gift I did for them in my blog "Terra Cotta Candle holder".

Tuesday, December 16, 2008

Personal Ceramic purse gift


This was personally done for our Friend's daughter who was performing Bharatnatyam (Indian Dance) concert/achievement. This is very tiny gift (amount of effort) compared to the effort the girl put in for her achievement. I wanted to gift her something which she can use.

Again as you know me, I tried out a new technique. This technique was done on a ceramic plate by a staff member in that store. So they taught me how to go about doing this one.

So paint the base white (only once) and the handle, rim and inside of the purse pink (3 times to get a darker color). Then using the other side of the paint brush keep dots (one bigger dot) using one color. Then on top of that bigger dot, keep a little smaller dots (using different size brush) with a different color. Then again a third smaller dot on top of the second dot using a another different color. Fill up the whole purse with this kind of dots. Finished the piece by writing her name.

For more info on my ceramic painting experience refer to this link on "Introduction to ceramic painting" post.

canvas painting - wall Art


To add color to our living room I painted different colors on a canvas (which is already framed). Blocking the white areas with a tape, paint different colors on the bigger shapes as shown and once dried remove the tape. Then bodered the shapes with golden lines with a golden pen and drew spiral designs on each of them. Then on the white areas, made dots with different colors and with black paint made lines to get a design.

This project was actually a trial and error thing, but now this is hanging in our living room , liked and getting appreciated by all our friends who come by want to know,how I went about doing this one.

Saturday, December 13, 2008

First Terra Cotta POT Painting

Terra cots Pots :- have come a long way into the crafting world with delightful results. They can be used for candle holders, bells, ornaments, and even angels. You can use any type of stencils or rubber stamps, rub-ons , scrapbook papers, florals, charms, buttons and everything. The book I reffered for my projects are from Micheals store "102 Terra Cotta Projects" by Lenae Gerig.


About my project

This was the second gift given to the teachers during Dec 07 Christmas time. To view the other gift done for the teachers Refer to blog "Dec 07 ceramic gifts for teachers". Designed it as a candle holder and of Christmas theme. Painted the pot green and the rim red. Then did a snowflake design with white pen (terra cotta marker pens) and wrote merry Christmas on them. Painted the inside of the pot black. Sealed with a glaze selear which gives a shiny effect for the pot. In some pot as you can see I have used also the golden pen for the design. Wrote my son's name and the class name under the pot.

The basic tips for working with Terra Cotta pots are

  • Sealing :Terra cotta is very porous and requires sealing before painting. Seal with the liquid sealer before painting. This will save time, the amount of paint used to cover the pot and help prevent breaking and chipping.
  • Painting your Design : Paint your project with the desired colors and design.
  • Seal at the end: After painting your pot, seal again, this will not smear any pen work and give a nice finish. I used a glaze sealer, which gave a shinning effect to it.


Dec 07 Christmas Gifts for teachers


Have been doing lot of ceramic projects, but did not find the time to upload them in my blog. I guess with 2 kids just life circles around them and we hardly get time to update.

Coming to the picture on the left was given to my son's school teachers (preschool class ) (did 2 of them same type). This was tough one as you had to mark each row and paint different colors (3 times to get that intensity). Then the black design was done with a stamp with the black paint done only once. Under the mug wrote the teachers names in black paint and the class name.

The picture (purple and yellow) on to your right was given to his music teacher. This also you had to mark the columns and paint them alternatively purple and yellow 3 times. Once they are dried, made the white design (love sign) and wrote "live, Love and laugh" on each column.


For more info on my ceramic painting experience refer to this link on "Introduction to ceramic painting" post.
To view the other gift done for the teachers Refer to the blog "first Terra Cotta pot painting"

Tuesday, December 09, 2008

Star Ceramic Gift Box


This is again another ceramic project of mine, made it as a gift for my sister in law. The inside and outer cover is dark green and the base of the box is white. With contrast of green and white flower design.

This star gift box can also be used as a gift during valentines day, or birthdays. Indeed it was a nice gift for my sister in law.

For more info on my ceramic painting experience refer to this link on "Introduction to ceramic painting" post.

WindMill for my Son's bday party gift


Did this windmill as one of the items of goody bag for my son's 3rd bday party in his Montesoori school. All the kids and the teachers loved this idea.

Purchased the windmill craft kit from a craft store online, manually had to fold them and make the windmill (with the instructions given ) and color and paint them according to our taste. Since he was learning ABCs and 123, decided to print A B C... Z on one side and color the front side with crayons, and glitter paint.


Manually doing 42 (only 30 needed for school but did some extra ones for him to play and to give the neighboring kids) was a challenge as I was really getting tired with my second pregnancy and was in due in 2 months. So getting sleep itself was a challenge but worth all the effort I put into this. My son loved them.

Sunday, February 25, 2007

Embroidary BookMark


Initiated this project with the interest of expanding my Embroidery skills from cloth to paper to make something useful for my son’s teachers 2006 christmas gifts.

Well the effort and time is very minimal compared to their dedication, patience, efforts put to make my son’s day happy and memorable at school.

Purchased the supplies and design online , pre-pricked the embroidery design with a special piercing tool and pricking pad. Completed the embroidery and came up with my own ideas to finish it off with red ribbon for border, and glued some blue heart beads for the flower for the Front and beautified the back of the bookmark personalizing each teachers name and 2 teacher quotes as a part of inspiration for them .


This gives me a sense of satisfaction and happiness when I can make something personally for each of to appreciate their work.

All my efforts were worth it and rewarded when all the teachers loved it and were very surprised that I actually tried this out for the first time specially for them.


Paper Clay Magnets - new project


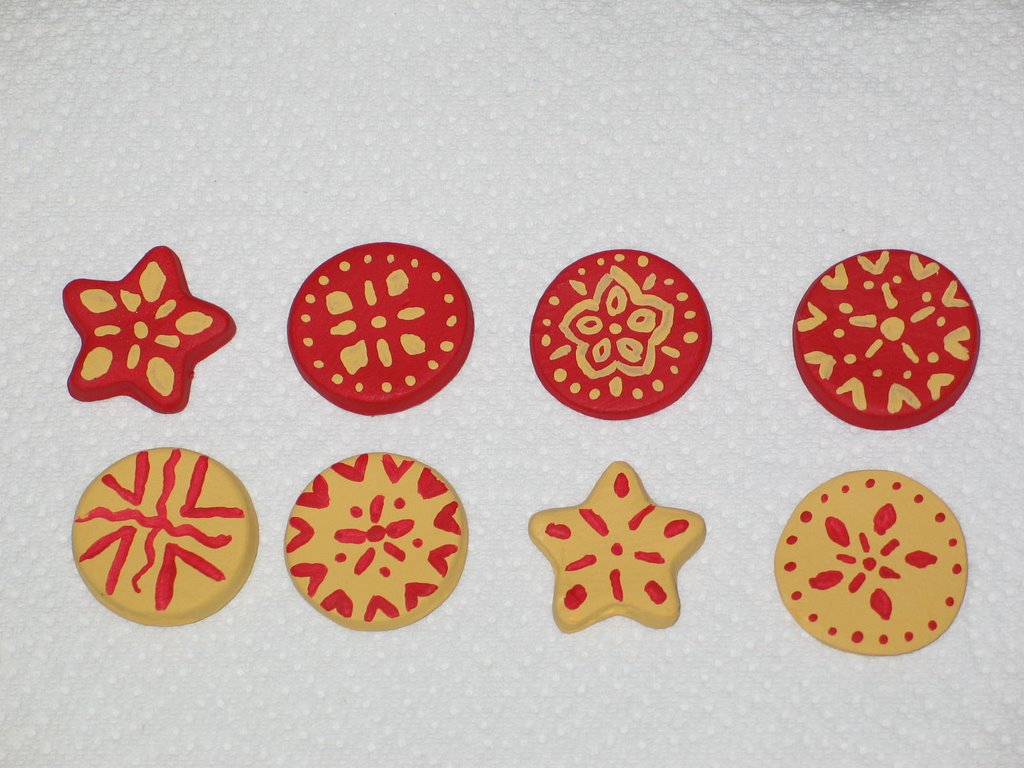
This is entirely a new project for experimentation with paper clay. This project I've made is to create custom magnets. Refered a book from library for the procedure ( Micheals book- arts and crafts with paper).

Purchased the paper clay from a craft store, mold the clay following the directions given in the pacakge. Using a clay cutter, cut out different shapes (I had a star clay cutter and a round clay cutter. I decided to use these 2 designs.).

Then you smooth the individual pieces, remove any rough edges with just by wetting your hand with water. Take care not to wet the pieces too much. Then allow it to dry overnight or may be 2 days. Then paint the pieces individually. Finish off by glazing it for the shine (the photo with glazed effect is not attached for clarity purposes).

Then you buy magnets which you get in any craft store, and you can stick at the back of these pieces and use them as custom made magenets.

They suggested this as a gift for any kids, with their name, which they can use to hang things on the regrigirator.

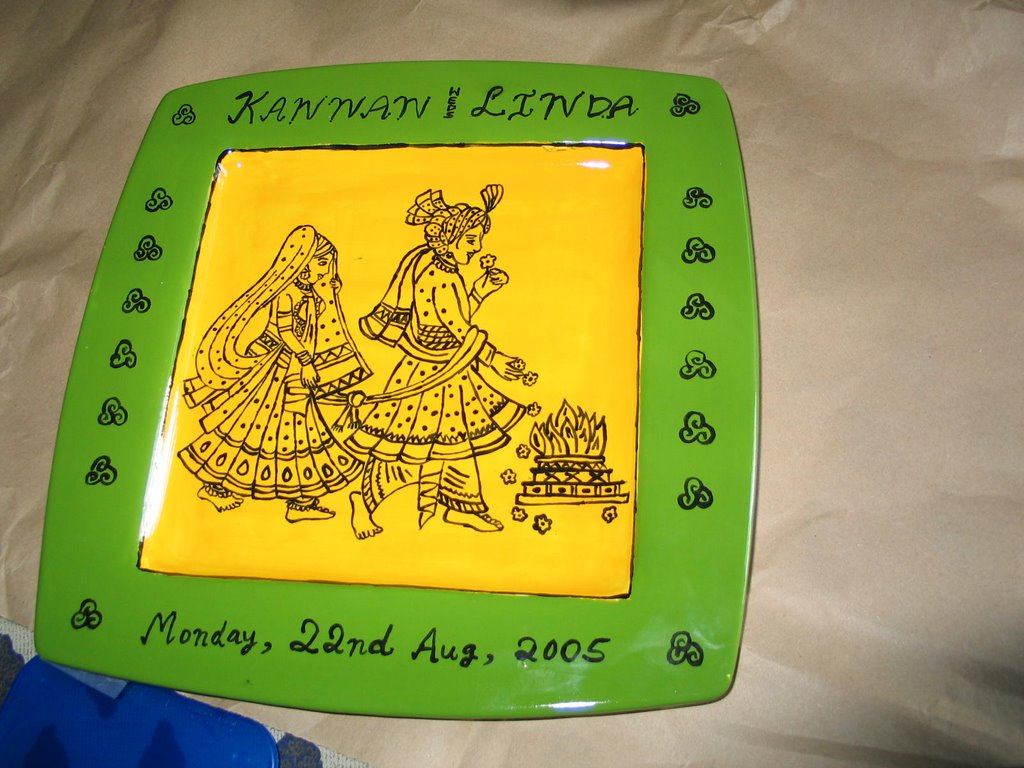
A Ceramic plate ( memory gift )


With a whole lot of confidence with Ceramic painting and this being my 5th piece I wanted to make something really special and personal for my brother-in-law and wife for their 1st wedding Anniversary gift in August of 2006.

Fetched this design online which depicts an Indian Wedding where the ceremony is essentially a Vedic Yagna (fire-sacrifice). By law and by tradition, no Hindu marriage is deemed complete unless in the presence of Sacred Fire, seven encirclements have been made around it by bride and the groom together.

They loved this piece too and it makes my effort and inspiration well worth it.